网络上有很多写NIO的文章, 但是大多讲的网络那一块, 我想像前俩次那样先从磁盘IO讲起, 然后慢慢过渡到网络IO, 再慢慢地进入socket, epoll, 能有这样一个循序渐进的过程.
仍然从一个读文件的小demo程序开始入手分析
1
2
3
4
5
6
7
8
9
10
11
public class TestFileChannel public static void main (String[] args) throws IOException FileInputStream inputStream = new FileInputStream("./10bytes.txt" ); FileChannel channel = inputStream.getChannel(); ByteBuffer byteBuffer = ByteBuffer.allocate(10 ); channel.read(byteBuffer); } }
看一下getChannel()实现
1
2
3
4
5
6
7
8
public FileChannel getChannel () synchronized (this ) { if (channel == null ) { channel = FileChannelImpl.open(fd, path, true , false , this ); } return channel; } }
getChannel()的源码很简单, 就是直接生成了一个FileChannelImpl实例
1 2 3 4 5 6 7 8 9 public static FileChannel open (FileDescriptor fd, String path, boolean readable, boolean writable, Object parent) { return new FileChannelImpl (fd, path, readable, writable, false , parent); }
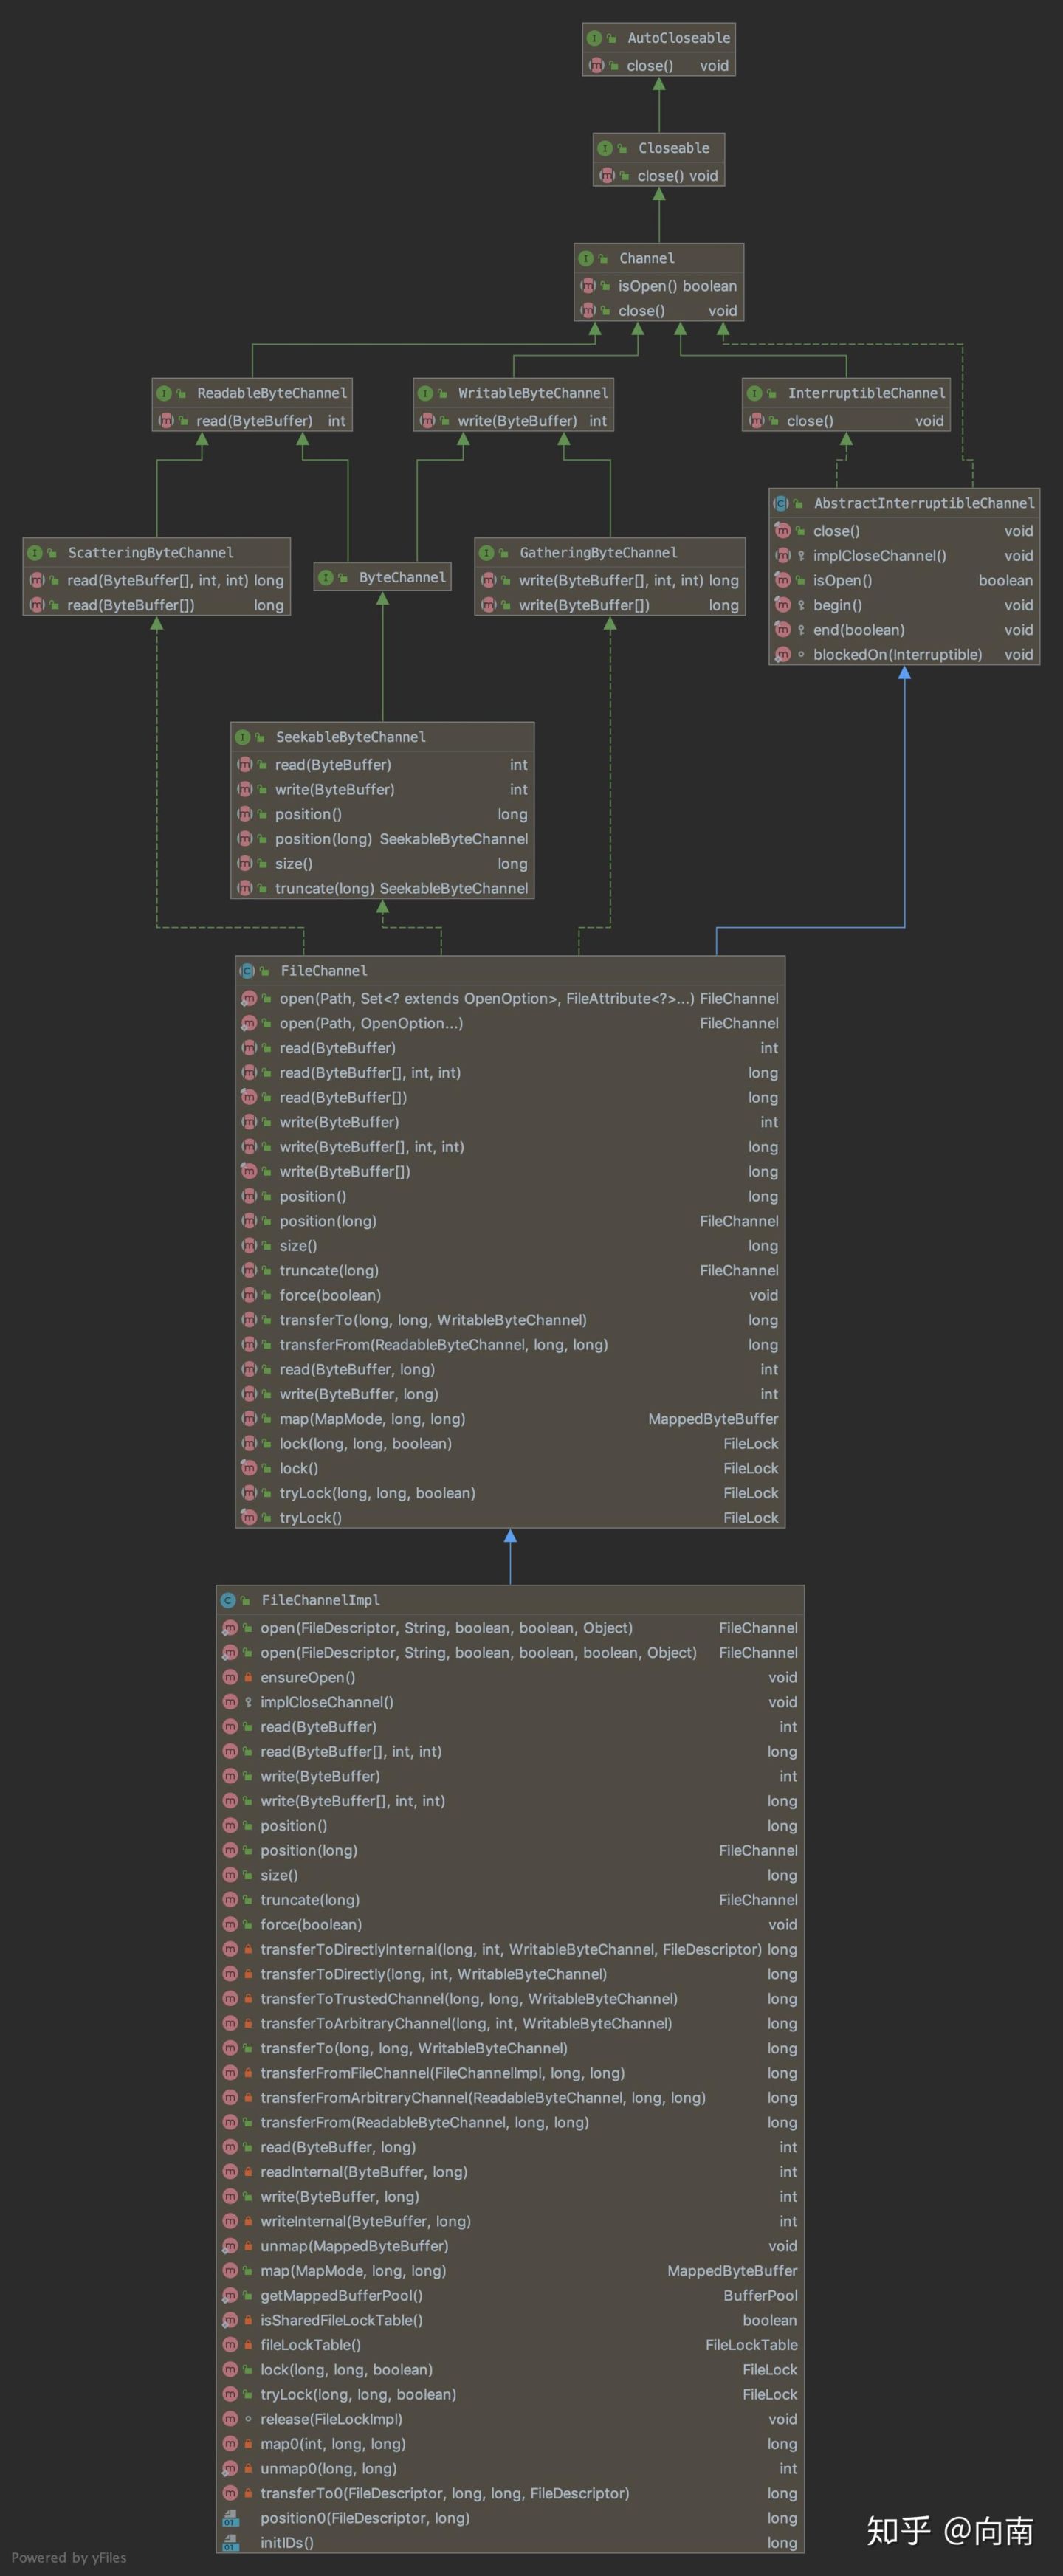
通过上面的UML类图, 可以看到FileChannel主要是定义了一些抽象方法, 真正的读写实现是在FileChannelImpl中实现的.
1 2 3 4 5 6 7 8 9 10 11 12 13 14 15 16 17 18 19 20 21 22 23 24 25 public int read (ByteBuffer dst) throws IOException ensureOpen (); if (!readable) throw new NonReadableChannelException (); synchronized (positionLock) { int n = 0 ; int ti = -1 ; try { begin (); ti = threads.add (); if (!isOpen ()) return 0 ; do { n = IOUtil.read (fd, dst, -1 , nd); } while ((n == IOStatus.INTERRUPTED) && isOpen ()); return IOStatus.normalize (n); } finally { threads.remove (ti); end (n > 0 ); assert IOStatus.check (n); } } }
可以看到真正的IO逻辑调用是 IOUtil.read(fd, dst,-1, nd)
1 2 3 4 5 6 7 8 9 10 11 12 13 14 15 16 17 18 19 20 21 22 23 static int read (FileDescriptor fd, ByteBuffer dst, long position, NativeDispatcher nd) throws IOException { if (dst.isReadOnly ()) throw new IllegalArgumentException ("Read-only buffer" ); if (dst instanceof DirectBuffer) return readIntoNativeBuffer (fd, dst, position, nd); ByteBuffer bb = Util.getTemporaryDirectBuffer (dst.remaining ()); try { int n = readIntoNativeBuffer (fd, bb, position, nd); bb.flip (); if (n > 0 ) dst.put (bb); return n; } finally { Util.offerFirstTemporaryDirectBuffer (bb); } }
通过上面的代码可以清楚的看到整个读操作流程:
如果ByteBuffer是DirectBuffer类型的, 则直接调用readIntoNativeBuffer()函数, 将数据读入进dst里面去
如果ByteBuffer不是DirectBuffer类型的, 则先申请一个临时的DirectBuffer bb
然后调用readIntoNativeBuffer()函数, 将数据读入到bb里面去
如果读取到的数量大于0, 则将临时DirectBuffer里的数据拷贝到目标ByteBuffer dst里面去
最后将DirectBuffer释放掉或者放入一个buffer cache中
第二步为什么要申请一个临时的directbuffer呢?因为directbuffer不会受到gc的直接管理。如果我们直接使用heapbuffer,当gc的时候会对heapbuffer里面的内容进行移动。
Util.getTemporaryDirectBuffer() 和offerFirstTemporaryDirectBuffer()方法实现如下, 逻辑很简单, 就不解释了
1
2
3
4
5
6
7
8
9
10
11
12
13
14
15
16
17
18
19
20
21
22
23
24
25
26
27
28
29
30
31
32
33
34
35
public static ByteBuffer getTemporaryDirectBuffer (int size) if (isBufferTooLarge(size)) { return ByteBuffer.allocateDirect(size); } BufferCache cache = bufferCache.get(); ByteBuffer buf = cache.get(size); if (buf != null ) { return buf; } else { if (!cache.isEmpty()) { buf = cache.removeFirst(); free(buf); } return ByteBuffer.allocateDirect(size); } } static void offerFirstTemporaryDirectBuffer (ByteBuffer buf) if (isBufferTooLarge(buf)) { free(buf); return ; } assert buf != null ; BufferCache cache = bufferCache.get(); if (!cache.offerFirst(buf)) { free(buf); } }
下来看一下readIntoNativeBuffer() 这个方法的实现
1
2
3
4
5
6
7
8
9
10
11
12
13
14
15
16
17
18
19
20
21
22
23
private static int readIntoNativeBuffer (FileDescriptor fd, ByteBuffer bb, long position, NativeDispatcher nd) throws IOException { int pos = bb.position(); int lim = bb.limit(); assert (pos <= lim); int rem = (pos <= lim ? lim - pos : 0 ); if (rem == 0 ) return 0 ; int n = 0 ; if (position != -1 ) { n = nd.pread(fd, ((DirectBuffer)bb).address() + pos, rem, position); } else { n = nd.read(fd, ((DirectBuffer)bb).address() + pos, rem); } if (n > 0 ) bb.position(pos + n); return n; }
我们看到最终是通过调用NativeDispatcher的read相关方法实现的读操作.
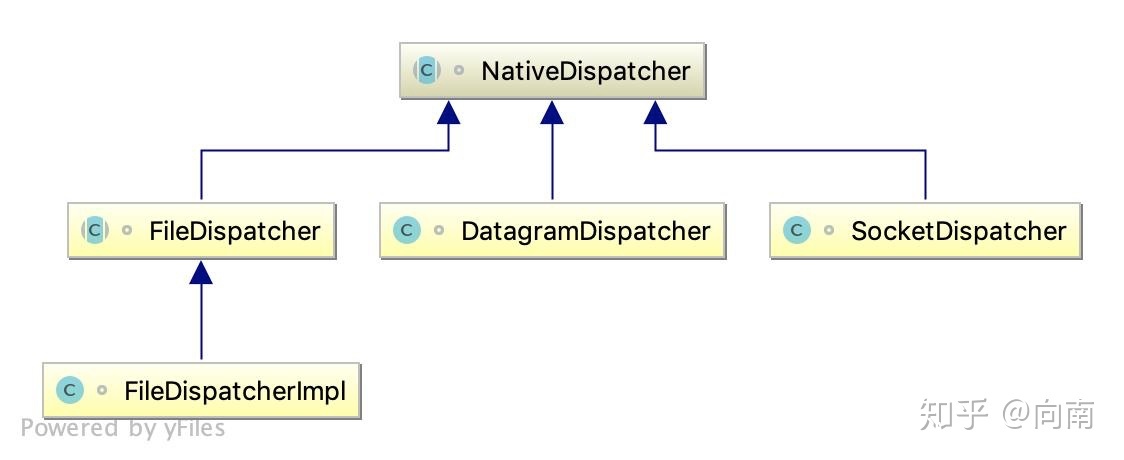
因为我们是在分析文件IO, 因此直接看一下FileDispatcherImpl的实现
1 2 3 4 5 6 7 8 9 10 11 12 13 14 15 16 17 18 19 20 21 22 23 24 25 26 27 28 29 30 31 32 33 34 35 36 37 38 39 40 41 42 43 44 45 46 47 48 49 50 51 52 53 class FileDispatcherImpl extends FileDispatcher {int read (FileDescriptor fd, long address, int len) throws IOException return read0 (fd, address, len); } int pread (FileDescriptor fd, long address, int len, long position) throws IOException { return pread0 (fd, address, len, position); } long readv (FileDescriptor fd, long address, int len) throws IOException return readv0 (fd, address, len); } int write (FileDescriptor fd, long address, int len) throws IOException return write0 (fd, address, len); } int pwrite (FileDescriptor fd, long address, int len, long position) throws IOException { return pwrite0 (fd, address, len, position); } long writev (FileDescriptor fd, long address, int len) throws IOException { return writev0 (fd, address, len); } static native int read0 (FileDescriptor fd, long address, int len) throws IOException ; static native int pread0 (FileDescriptor fd, long address, int len, long position) throws IOException static native long readv0 (FileDescriptor fd, long address, int len) throws IOException ; static native int write0 (FileDescriptor fd, long address, int len) throws IOException ; static native int pwrite0 (FileDescriptor fd, long address, int len, long position) throws IOException static native long writev0 (FileDescriptor fd, long address, int len) throws IOException ;}
FileDispatcherImpl中定义了大量的native方法, 相关的实现还是在native方法中.
1 2 3 4 5 6 7 8 9 10 11 JNIEXPORT jint JNICALL Java_sun_nio_ch_FileDispatcherImpl_read0 (JNIEnv *env, jclass clazz, jobject fdo, jlong address, jint len) jint fd = fdval (env, fdo); void *buf = (void *)jlong_to_ptr (address); return convertReturnVal (env, read (fd, buf, len), JNI_TRUE); }
通过和 nd.read(fd,((DirectBuffer)bb).address()+ pos, rem); 这一段程序对比可以得到
fdo 就是 FileDescriptor fdaddress 就是 ((DirectBuffer)bb).address()+ poslen 就是rem, (pos <= lim ? lim - pos :0);
read(fd, buf, len) 这段程序就是将剩余的len长度的数据读取进DirectBuffer的剩余的空间中.
1 2 3 4 5 6 7 8 9 10 11 12 13 14 15 16 17 jint convertReturnVal (JNIEnv *env, jint n, jboolean reading) if (n > 0 ) return n; if (n == 0 ) { if (reading) { return IOS_EOF; } else { return 0 ; } } JNU_ThrowIOExceptionWithLastError (env, "Read/write failed" ); return IOS_THROWN; }
从上面的例子, 我们可以看出, 在NIO读的时候, 我们应该直接分配一个DirectBytebuffer,而不是分配一个HeapByteBuffer, 那样一来就可以减少一次内存拷贝。
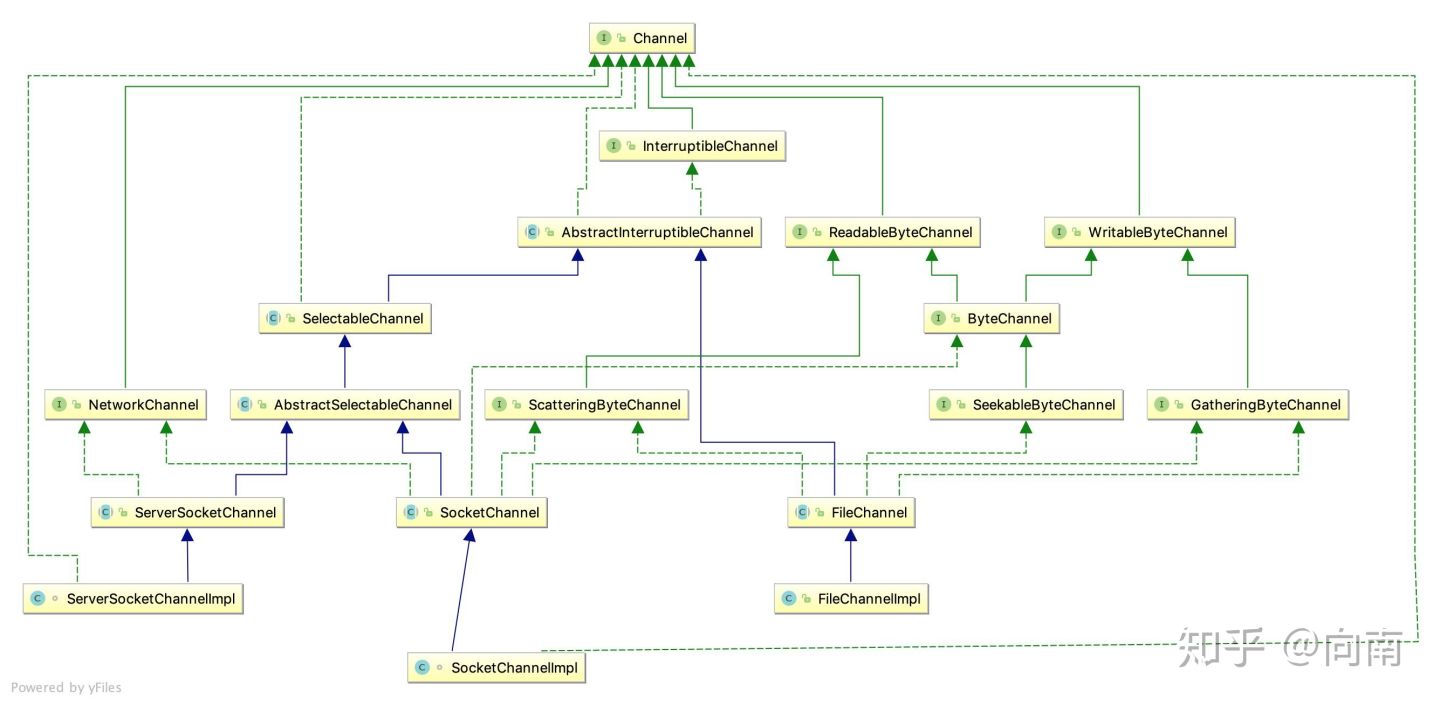
预告一点东西, FileChannel 并不能像SocketChannel一样可以设置成非阻塞模式, 其实是 SelectableChannel 接口中定义了 configureBlocking() 方法
在刚开始的read方法中有如下一段
1
2
3
4
5
6
7
8
9
10
11
12
13
14
try { begin(); ti = threads.add(); if (!isOpen()) return 0 ; do { n = IOUtil.read(fd, dst, -1 , nd); } while ((n == IOStatus.INTERRUPTED) && isOpen()); return IOStatus.normalize(n); } finally { threads.remove(ti); end(n > 0 ); assert IOStatus.check(n); }
begin(); 和 end(n >0); 这俩段代码参考


