CGLib 动态代理 原理解析
首先来看一段CGLib代理的测试代码(MethodInterceptor的测试, 其他类型这里不做展开了). Util类的代码在后面给出的码云片段中
1
2
3
4
5
6
7
8
9
10
11
12
13
14
15
16
17
18
19
20
21
22
23
24
25
26
27
28
29
30
31
32
| public class MethodInterceptorTest {
public static void main(String[] args) throws InterruptedException {
List list = new ArrayList<>();
Enhancer enhancer = new Enhancer();
enhancer.setSuperclass(A.class);
enhancer.setCallback((MethodInterceptor) (obj, method, args1, proxy) -> {
System.out.println("proxy start : " + proxy.getClass() + ": " + obj.getClass());
Util.printCreateInfo(list.get(0));
Object res2 = proxy.invokeSuper(obj, args1);
System.out.println("proxy over");
return res2;
});
A proxy = (A) enhancer.create();
list.add(proxy);
System.out.println(proxy.getClass().getName().replaceAll("\\.", "/"));
proxy.printHi();
proxy.printFinalHi();
Util.printClassInfo(proxy);
}
public static class A {
public void printHi() {
System.out.println("hi");
}
public final void printFinalHi() {
System.out.println("hi");
}
}
}
|
下面的输出结果除了测试动态代理生效结果外, 还将动态代理生成的类名也输出出来了. 这些类名信息, 在后面的分析中会用到.
1
2
3
4
5
6
7
8
9
10
11
12
13
14
15
16
17
18
19
20
21
22
23
24
25
26
27
28
29
30
31
32
33
34
35
36
| Current Pid is:54801
co/wangming/cglib/methodinterceptor/MethodInterceptorTest$A$$EnhancerByCGLIB$$b5ca7abc
proxy start : class net.sf.cglib.proxy.MethodProxy: class co.wangming.cglib.methodinterceptor.MethodInterceptorTest$A$$EnhancerByCGLIB$$b5ca7abc
*****************CreateInfo***********************
Proxy Class: class co.wangming.cglib.methodinterceptor.MethodInterceptorTest$A$$EnhancerByCGLIB$$b5ca7abc
CGLIB$printHi$0$Proxy CreateInfo : class net.sf.cglib.proxy.MethodProxy$CreateInfo
CGLIB$printHi$0$Proxy CreateInfo c1: class co.wangming.cglib.methodinterceptor.MethodInterceptorTest$A
CGLIB$printHi$0$Proxy CreateInfo c2: class co.wangming.cglib.methodinterceptor.MethodInterceptorTest$A$$EnhancerByCGLIB$$b5ca7abc
CGLIB$equals$1$Proxy CreateInfo : class net.sf.cglib.proxy.MethodProxy$CreateInfo
CGLIB$equals$1$Proxy CreateInfo c1: class java.lang.Object
CGLIB$equals$1$Proxy CreateInfo c2: class co.wangming.cglib.methodinterceptor.MethodInterceptorTest$A$$EnhancerByCGLIB$$b5ca7abc
CGLIB$toString$2$Proxy CreateInfo : class net.sf.cglib.proxy.MethodProxy$CreateInfo
CGLIB$toString$2$Proxy CreateInfo c1: class java.lang.Object
CGLIB$toString$2$Proxy CreateInfo c2: class co.wangming.cglib.methodinterceptor.MethodInterceptorTest$A$$EnhancerByCGLIB$$b5ca7abc
CGLIB$hashCode$3$Proxy CreateInfo : class net.sf.cglib.proxy.MethodProxy$CreateInfo
CGLIB$hashCode$3$Proxy CreateInfo c1: class java.lang.Object
CGLIB$hashCode$3$Proxy CreateInfo c2: class co.wangming.cglib.methodinterceptor.MethodInterceptorTest$A$$EnhancerByCGLIB$$b5ca7abc
CGLIB$clone$4$Proxy CreateInfo : class net.sf.cglib.proxy.MethodProxy$CreateInfo
CGLIB$clone$4$Proxy CreateInfo c1: class java.lang.Object
CGLIB$clone$4$Proxy CreateInfo c2: class co.wangming.cglib.methodinterceptor.MethodInterceptorTest$A$$EnhancerByCGLIB$$b5ca7abc
*****************CreateInfo***********************
hi
proxy over
hi
*****************FastClassInfo***********************
Proxy Class: class co.wangming.cglib.methodinterceptor.MethodInterceptorTest$A$$EnhancerByCGLIB$$b5ca7abc
CGLIB$printHi$0$Proxy FastClassInfo : class net.sf.cglib.proxy.MethodProxy$FastClassInfo
CGLIB$printHi$0$Proxy FastClass f1: class co.wangming.cglib.methodinterceptor.MethodInterceptorTest$A$$FastClassByCGLIB$$65f2d708
CGLIB$printHi$0$Proxy FastClass f2: class co.wangming.cglib.methodinterceptor.MethodInterceptorTest$A$$EnhancerByCGLIB$$b5ca7abc$$FastClassByCGLIB$$19e0f1ba
CGLIB$printHi$0$Proxy FastClass i1: 0
CGLIB$printHi$0$Proxy FastClass i2: 14
---->
---->
---->
---->
****************FastClassInfo************************
|
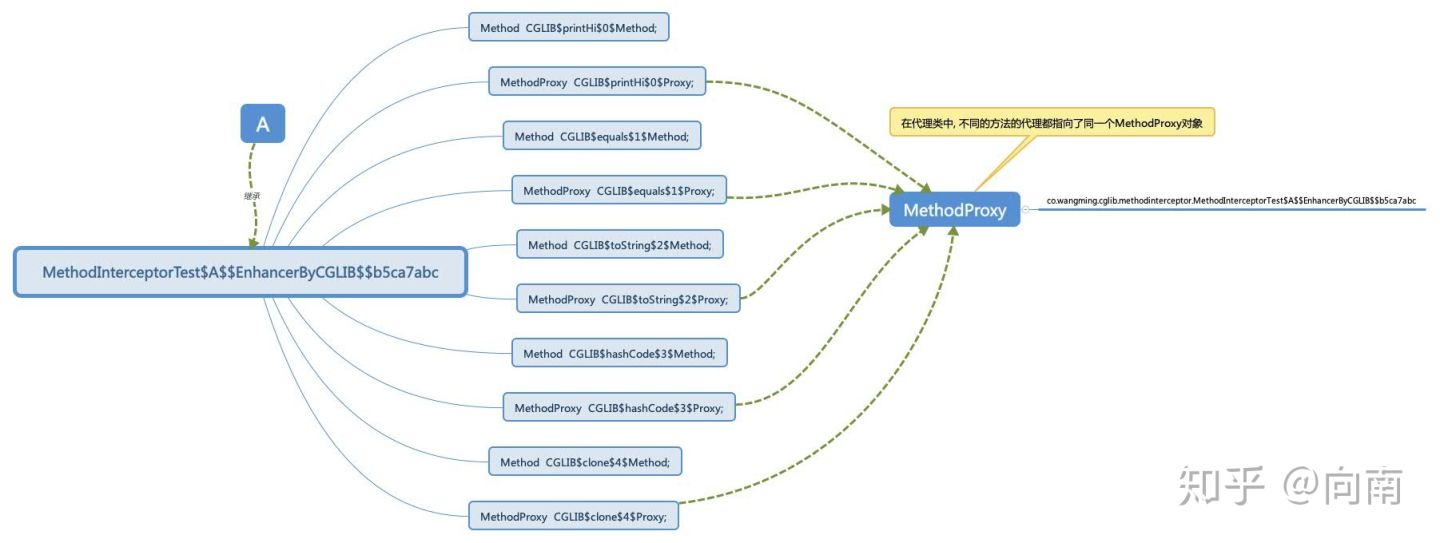
由于生成的代理类的代码过于长, 而知乎没有折叠功能, 所以我将这个代码片段放到了码云上面 . A的代理类的名称是: MethodInterceptorTest$A$$EnhancerByCGLIB$$b5ca7abc 生成的类在底部
从printHi()方法入手, 看看它的代理是怎么实现的.
1
2
3
4
5
6
7
8
9
10
11
12
13
14
15
16
17
18
19
20
21
22
23
24
25
26
27
28
29
30
31
32
33
34
35
36
37
38
39
40
41
42
43
44
45
46
47
48
49
50
51
52
53
54
55
56
|
private static final Method CGLIB$printHi$0$Method;
private static final MethodProxy CGLIB$printHi$0$Proxy;
private MethodInterceptor CGLIB$CALLBACK_0;
public MethodInterceptorTest$A$$EnhancerByCGLIB$$9805b321() {
CGLIB$BIND_CALLBACKS(this);
}
private static final void CGLIB$BIND_CALLBACKS(Object var0) {
MethodInterceptorTest$A$$EnhancerByCGLIB$$b5ca7abc var1 = (MethodInterceptorTest$A$$EnhancerByCGLIB$$b5ca7abc)var0;
if (!var1.CGLIB$BOUND) {
var1.CGLIB$BOUND = true;
Object var10000 = CGLIB$THREAD_CALLBACKS.get();
if (var10000 == null) {
var10000 = CGLIB$STATIC_CALLBACKS;
if (var10000 == null) {
return;
}
}
var1.CGLIB$CALLBACK_0 = (MethodInterceptor)((Callback[])var10000)[0];
}
}
static {
CGLIB$STATICHOOK1();
}
static void CGLIB$STATICHOOK1() {
CGLIB$THREAD_CALLBACKS = new ThreadLocal();
CGLIB$emptyArgs = new Object[0];
Class var0 = Class.forName("co.wangming.cglib.methodinterceptor.MethodInterceptorTest$A$$EnhancerByCGLIB$$b5ca7abc");
Class var1;
CGLIB$printHi$0$Method = ReflectUtils.findMethods(new String[]{"printHi", "()V"}, (var1).getDeclaredMethods())[0];
CGLIB$printHi$0$Proxy = MethodProxy.create(var1, var0, "()V", "printHi", "CGLIB$printHi$0");
}
public final void printHi() {
MethodInterceptor var10000 = this.CGLIB$CALLBACK_0;
if (var10000 == null) {
CGLIB$BIND_CALLBACKS(this);
var10000 = this.CGLIB$CALLBACK_0;
}
if (var10000 != null) {
var10000.intercept(this, CGLIB$printHi$0$Method, CGLIB$emptyArgs, CGLIB$printHi$0$Proxy);
} else {
super.printHi();
}
}
|
上面简单分析了代理子类的实现, 但是这都不是重点, 真正的魔法在callback里面. demo里面callback是这么写的
1
2
3
4
5
6
| enhancer.setCallback((MethodInterceptor) (obj, method, args1, proxy) -> {
System.out.println("proxy start : " + proxy.getClass() + ": " + obj.getClass());
Object res = proxy.invokeSuper(obj, args);
System.out.println("proxy over");
return res;
});
|
proxy参数的类型是MethodProxy类型, MethodProxy有俩个invoke方法:
invoke(Object obj, Object[] args): obj参数不能是MethodInterceptor#intercept()方法的第一个参数obj对象, 否则会造成栈溢出invokeSuper(Object obj, Object[] args): obj参数必须是MethodInterceptor#intercept()方法的第一个参数obj对象
在使用MethodInterceptor的时候, 一定要注意上面这俩点, 下面我们就从invoke/invokeSuper方法入手, 分析一下.
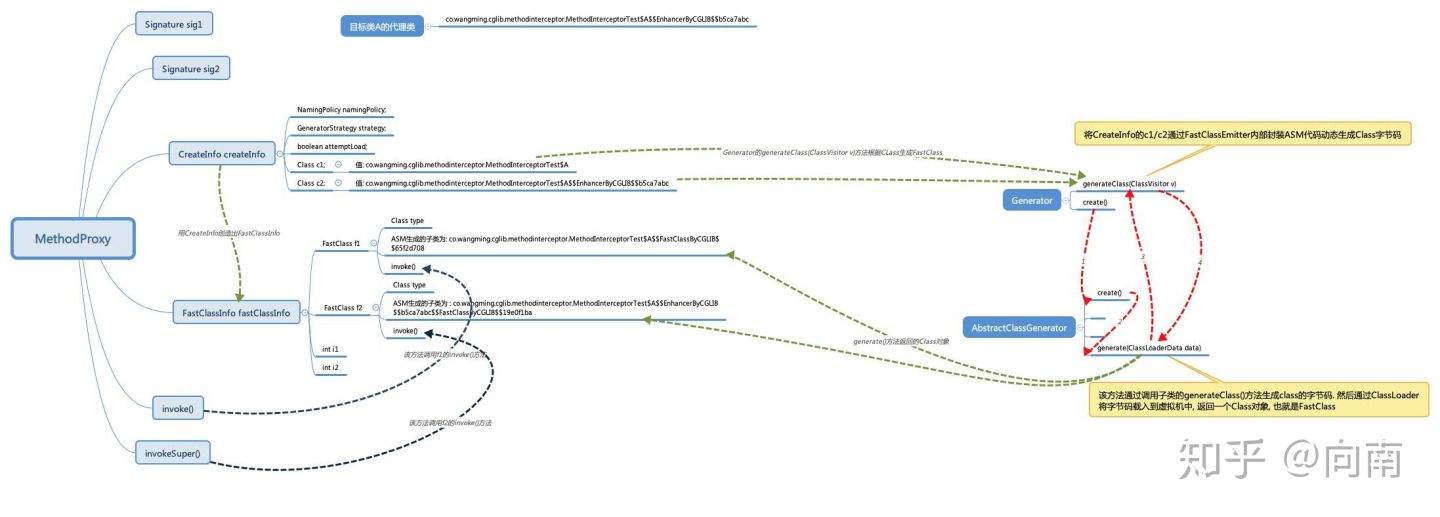
由于这一块的源码过多, 我就不一一都贴出来了, 我画了俩张图帮大家理顺一下.


MethodProxy类里面有一个CreateInfo对象. CreateInfo内部有俩个Class对象, 分别是
- c1: 目标类的Class对象
- c2: 目标类的强化类的Class对象, 也就是CGLib生成的目标类的代理子类
CGLib会利用CreateInfo对象去构建出FastClassInfo这个对象. 构建过程就是通过CreateInfo的c1/c2去分别构建出FastClassInfo里面的FastClass类型的f1/f2.
也就是说, 真正的是构建了俩个FastClass对象出来. FastClass对象是通过FastClass内部类Generator进行构建的. 而内部类Generator是将构建过程交给了它的父类AbstractClassGenerator#generate()方法的.
AbstractClassGenerator#generate()又是通过其内部类GeneratorStrategy的对象执行了构建. 最终实现构建的是FastClass#Generator()的generateClass()方法, 该方法实例化了一个FastClassEmitter对象, FastClassEmitter对象内部就是通过ASM去构建Class对象的.
invoke/invokeSuper方法实现如下
1
2
3
4
5
6
7
8
9
10
11
12
13
14
15
16
17
18
19
20
21
22
23
24
25
| public Object invoke(Object obj, Object[] args) throws Throwable {
try {
init();
FastClassInfo fci = fastClassInfo;
return fci.f1.invoke(fci.i1, obj, args);
} catch (InvocationTargetException e) {
throw e.getTargetException();
} catch (IllegalArgumentException e) {
if (fastClassInfo.i1 < 0)
throw new IllegalArgumentException("Protected method: " + sig1);
throw e;
}
}
public Object invokeSuper(Object obj, Object[] args) throws Throwable {
try {
init();
FastClassInfo fci = fastClassInfo;
return fci.f2.invoke(fci.i2, obj, args);
} catch (InvocationTargetException e) {
throw e.getTargetException();
}
}
|
init()方法如下
1
2
3
4
5
6
7
8
9
10
11
12
13
14
15
16
17
18
19
20
21
22
| private void init()
{
if (fastClassInfo == null)
{
synchronized (initLock)
{
if (fastClassInfo == null)
{
CreateInfo ci = createInfo;
FastClassInfo fci = new FastClassInfo();
fci.f1 = helper(ci, ci.c1);
fci.f2 = helper(ci, ci.c2);
fci.i1 = fci.f1.getIndex(sig1);
fci.i2 = fci.f2.getIndex(sig2);
fastClassInfo = fci;
createInfo = null;
}
}
}
}
|
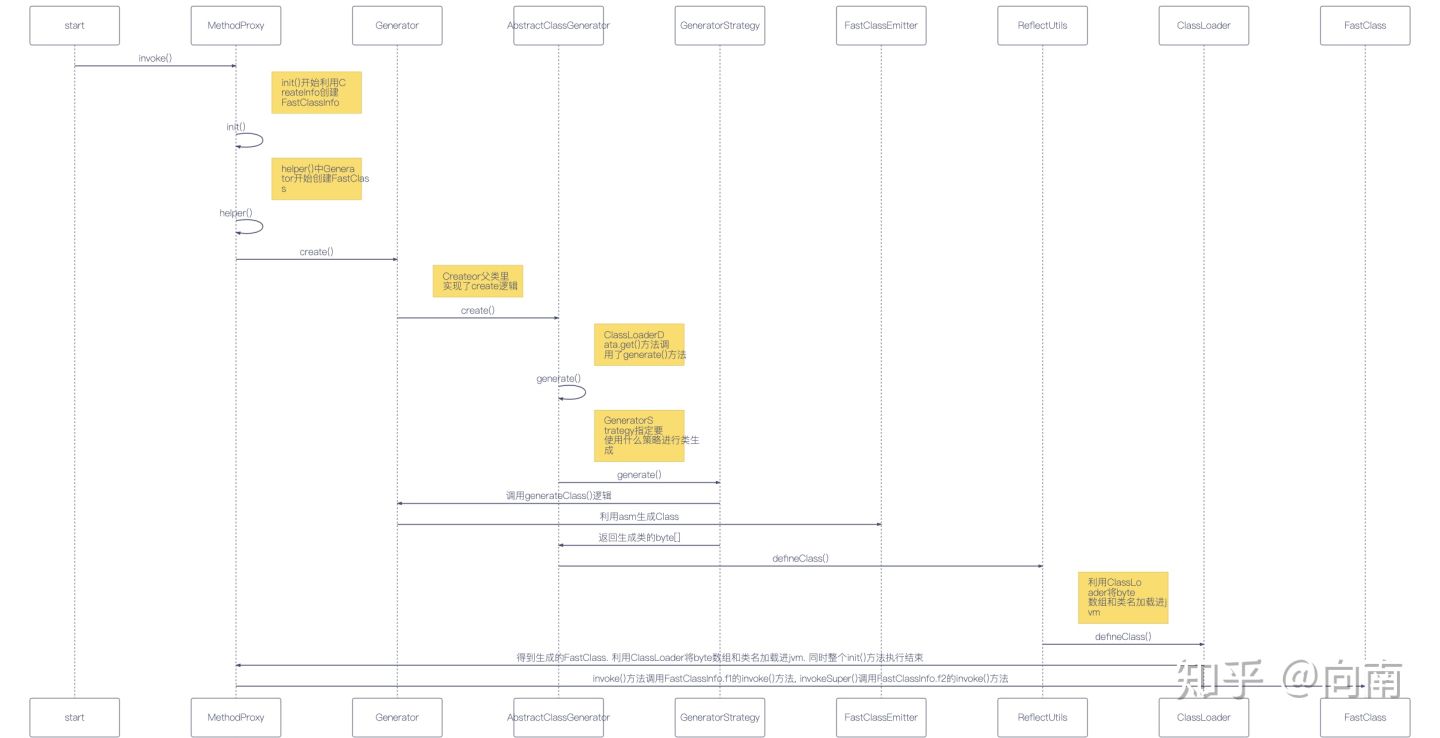
针对init()方法的过程可以参考一下下面的时序图

可以看出来, 整个CGLib的核心就在于这个FastClass
1
2
3
4
5
| abstract public class FastClass
{
private Class type;
...
}
|
FastClass是一个抽象类, CGLib在运行时通过FastClass内的Generator这个内部类将其子类动态生成出来, 然后再利用ClassLoader将生成的子类加载进JVM里面去.
其实, CGLib会为我们生成很多个代理类, 不单单是目标类的子类, 例如上文提到的FastClass f1, FastClass f2的子类是不同的.
MethodInterceptorTest$A$$FastClassByCGLIB$$65f2d708 : FastClassInfo#f1, MethodProxy的invoke()方法进行调用MethodInterceptorTest$A$$EnhancerByCGLIB$$b5ca7abc$$FastClassByCGLIB$$19e0f1ba : FastClassInfo#f2, MethodProxy的invokeSuper()方法进行调用
1
2
3
4
5
6
7
8
9
10
11
12
13
14
15
16
17
18
19
20
21
22
23
24
25
26
27
28
| public class MethodInterceptorTest$A$$FastClassByCGLIB$$65f2d708 extends FastClass {
public Object invoke(int var1, Object var2, Object[] var3) throws InvocationTargetException {
A var10000 = (A)var2;
int var10001 = var1;
try {
switch(var10001) {
case 0:
var10000.printHi();
return null;
case 1:
var10000.printFinalHi();
return null;
case 2:
A.printStaticHi();
return null;
case 3:
return new Boolean(var10000.equals(var3[0]));
case 4:
return var10000.toString();
case 5:
return new Integer(var10000.hashCode());
}
} catch (Throwable var4) {
throw new InvocationTargetException(var4);
}
}
}
|
在刚开始的demo中, 如果进行如下调用, 会发生递归.
1
2
3
4
5
6
7
| eznhancer.setCallback((MethodInterceptor) (obj, method, args1, proxy) -> {
System.out.println("proxy start : " + proxy.getClass() + ": " + obj.getClass());
Util.printCreateInfo(list.get(0));
Object res2 = proxy.invoke(obj, args1);
System.out.println("proxy over");
return res2;
});
|
这是因为(FastClassInfo#i1 的值为0, 因此var1为0, 刚开始的运行日志有输出 )
1
2
3
4
5
6
7
8
9
10
11
12
13
14
15
| public class MethodInterceptorTest$A$$FastClassByCGLIB$$65f2d708 extends FastClass {
public Object invoke(int var1, Object var2, Object[] var3) throws InvocationTargetException {
A var10000 = (A)var2;
int var10001 = var1;
try {
switch(var10001) {
case 0:
var10000.printHi();
return null;
}
} catch (Throwable var4) {
throw new InvocationTargetException(var4);
}
}
}
|
此时的var10000就是obj, 那么流畅就成了又会去调用MethodInterceptorTest$A$$EnhancerByCGLIB$$b5ca7abc的printHi()
1
2
3
4
5
6
7
8
9
| public final void printHi() {
MethodInterceptor var10000 = this.CGLIB$CALLBACK_0;
if (var10000 != null) {
var10000.intercept(this, CGLIB$printHi$0$Method, CGLIB$emptyArgs, CGLIB$printHi$0$Proxy);
} else {
super.printHi();
}
}
|
因此当调用MethodProxy的invoke()方法时, 必须不能是MethodInterceptor#intercept的第一个obj参数.
而invokeSuper就不会有这个问题, FastClassInfo#i2的值为 14,
1
2
3
4
5
6
7
8
9
10
11
12
13
14
15
16
17
18
19
20
21
22
23
24
25
26
| public class MethodInterceptorTest$A$$EnhancerByCGLIB$$b5ca7abc$$FastClassByCGLIB$$19e0f1ba extends FastClass {
public Object invoke(int var1, Object var2, Object[] var3) throws InvocationTargetException {
b5ca7abc var10000 = (b5ca7abc)var2;
int var10001 = var1;
try {
switch(var10001) {
case 7:
var10000.printHi();
return null;
case 14:
var10000.CGLIB$printHi$0();
return null;
case 21:
var10000.printFinalHi();
return null;
case 22:
A.printStaticHi();
return null;
}
} catch (Throwable var4) {
throw new InvocationTargetException(var4);
}
throw new IllegalArgumentException("Cannot find matching method/constructor");
}
|
因此执行的是var10000.CGLIB$printHi$0()这个方法
1
2
3
| final void CGLIB$printHi$0() {
super.printHi();
}
|
这是直接调用A的printHi()方法进行调用.


