图解 LinkedBlockingQueue 实现原理


图解 LinkedBlockingQueue 实现原理

背景知识:

如果想要对LinkedBlockingQueue原理有所了解的话, 就需要对Java的wait-notify线程通信机制有所了解.

在Object类里面, 定义了如下的几个方法wait()/notify()/notifyAll().

对某个lock对象进行加锁(synchronized(lock){...}).

在锁的内部, 当前线程调用了lock.wait()方法后, 当前线程就阻塞在当前的位置, 同时放弃了锁的占用, 此时其他的线程可以获取锁继续执行锁内的代码, 当然其他线程调用了lock.wait()方法后, 也会阻塞在这个位置, 重复刚才的步骤.

当在锁内调用lock.notify()方法后, 会随机唤醒一个阻塞在lock.wait()处的线程, 被唤醒的线程会继续尝试获取锁, 如果获取锁成功, 继续执行下面的代码.

下面看一段基于消费者/生产者模型实现的阻塞队列

1
2
3
4
5
6
7
8
9
10
11
12
13
14
15
16
17
18
19
20
21
22
23
24
25
26
27
28
29
30
31
32
33
34
35
36
37
38
39
40
41
42
43
44
45
46
47
48
49
50
51
52
53
54
55
56
57
58
59
60
61
62
63
64
65
66
67
68
69
70
public class BlockingList {

private static final int MAX = 1;

private volatile List<String> cache = new ArrayList<>();
private Object lock = new Object();

public void add(String string) {
synchronized (lock) {
System.out.println(Thread.currentThread().getName() + " ---> start add : " + string);
while (cache.size() == MAX) {
try {
// 已经达到最大数量, 生产线程让出锁, 让消费线程进入
lock.wait();
} catch (InterruptedException e) {
e.printStackTrace();
}
}
cache.add(string);
// 如果消费者线程阻塞了, 通知消费者线程, 有数据了, 可以读取了
lock.notify();
System.out.println(Thread.currentThread().getName() + " ---> finish add : " + string);
}
}

public String take() {
synchronized (lock) {
System.out.println(Thread.currentThread().getName() + " ---> start take");
while (cache.size() == 0) {
try {
// 队列里没有数据, 让生产者线程进入, 开始生产数据
lock.wait();
} catch (InterruptedException e) {
e.printStackTrace();
}
}
String item = cache.remove(0);
// 通知生产者线程, 队列有空余位置了, 可以添加数据了
lock.notify();
System.out.println(Thread.currentThread().getName() + " ---> finish take : " + item);
return item;
}
}

public static void main(String[] args) throws InterruptedException {
int producerSize = 2;
int consumerSize = 2;
int itemSize = 1;

BlockingList blockingList = new BlockingList();
for (int j = 0; j < producerSize; j++) {
new Thread(() -> {
for (int i = 0; i < itemSize; i++) {
blockingList.add("s" + i);
}
}, "Add -Thread-" + j).start();
}

TimeUnit.MILLISECONDS.sleep(1000);

for (int j = 0; j < consumerSize; j++) {
new Thread(() -> {
for (int i = 0; i < itemSize * producerSize / consumerSize; i++) {
String str = blockingList.take();
}
}, "Take-Thread-" + j).start();

}
}
}

在上面的代码中, 我们分别设置2个生产者, 2个消费者. 每个生产者生产1个数据, 每个消费者消费1个数据, 队列最大长度为1. 生产完之后等待1秒钟, 再让消费者去消费, 输出结果是

1
2
3
4
5
6
7
8
Add -Thread-0 ---> start  add  : s0
Add -Thread-0 ---> finish add : s0
Add -Thread-1 ---> start add : s0 //当前队列为1,再次添加的时候需要等待消费者消费
Take-Thread-0 ---> start take
Take-Thread-0 ---> finish take : s0
Add -Thread-1 ---> finish add : s0 //消费者消费了1个,可以继续生产数据了.
Take-Thread-1 ---> start take
Take-Thread-1 ---> finish take : s0

好了, 有了对wait-notify有了一个基本认识之后, 我们继续来看 LinkedBlockingQueue.
An optionally-bounded blocking queue based on linked nodes. This queue orders elements FIFO (first-in-first-out). The head of the queue is that element that has been on the queue the longest time. The tail of the queue is that element that has been on the queue the shortest time. New elements are inserted at the tail of the queue, and the queue retrieval operations obtain elements at the head of the queue. Linked queues typically have higher throughput than array-based queues but less predictable performance in most concurrent applications.

上面是 LinkedBlockingQueue (Java Platform SE 7 )的Java Doc上的说明, 从中可以看出, `LinkedBlockingQueue`` 是一个基于链表 可选边界的先进先出阻塞队列.

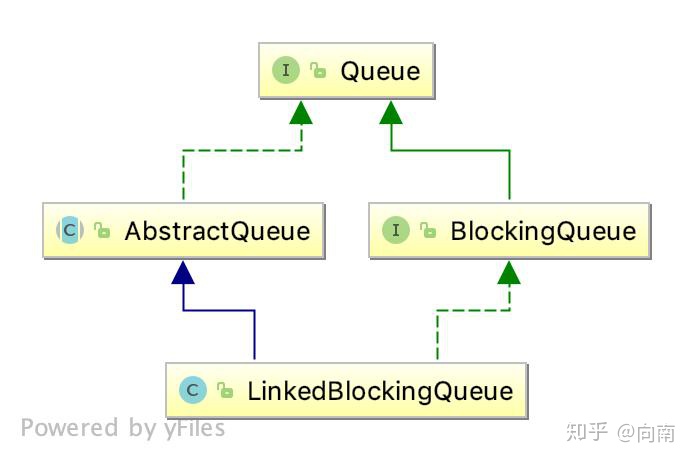
先从LinkedBlockingQueue的继承结构来大概了解一下`LinkedBlockingQueue``

我们看到LinkedBlockingQueue实现了Queue, BlockingQueue俩个接口和继承了AbstractQueue抽象类(其实它还实现了Collection接口, 这不是我们的重点就不再讲解了).

Queue定义了队列基础API, 定义三个入列方法, 三个出列方法.

  • add(E e) : 插入成功返回true, 插入失败则抛出异常
  • offer(E e): 插入成功返回true, 插入失败返回false
  • remove(): 出列队首元素, 队列为空抛出异常.
  • poll(): 出列队首元素, 队列为空返回false.
  • element(): 返回队首元素, 队列为空抛出异常.
  • peek():返回队首元素, 队列为空返回null.

BlockingQueue定义了阻塞相关API, 新增了俩个入列和俩个出列阻塞API.

  • put(E e): 队列非满则插入, 队列满则等待.
  • offer(E e, long timeout, TimeUnit unit): offer(E e)的带有等待时间的版本.
  • take(): 队列非空则出列, 队列空则等待.
  • poll(long timeout, TimeUnit unit): poll()的带有等待时间的版本.

AbstractQueue针对上面的接口提供了一些默认的实现

  • add(E e) : 基于offer(E e)实现
  • remove(): 基于poll()实现.
  • element(): 基于peek()实现.

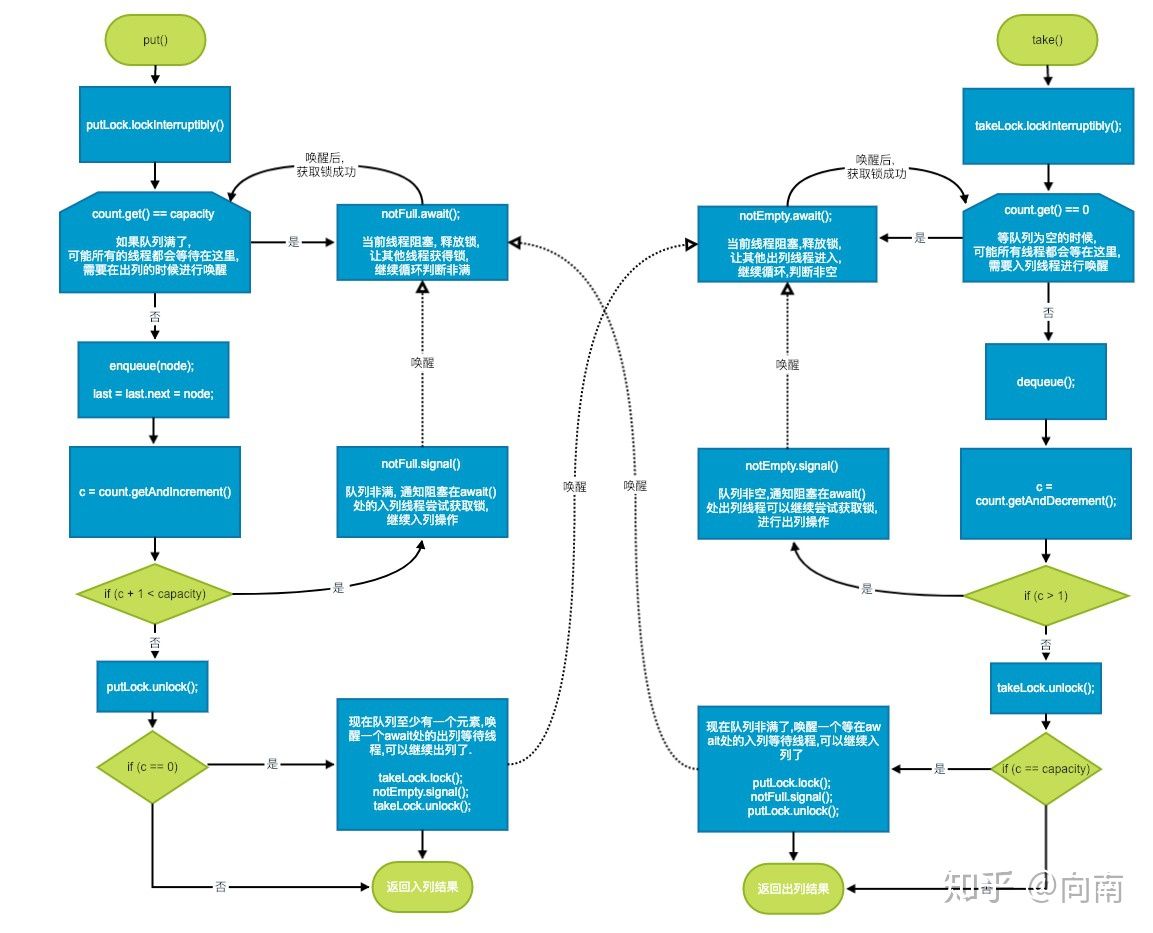
现在我们就对LinkedBlockingQueue有了一个大概的认识, 下面我从put()/take()俩个方法来看一下它的阻塞功能是如何实现的

put()

1
2
3
4
5
6
7
8
9
10
11
12
13
14
15
16
17
18
19
20
public void put(E e) throws InterruptedException {
int c = -1;
Node<E> node = new Node<E>(e);
final ReentrantLock putLock = this.putLock;
final AtomicInteger count = this.count;
putLock.lockInterruptibly();
try {
while (count.get() == capacity) {
notFull.await();
}
enqueue(node); // last = last.next = node;
c = count.getAndIncrement();
if (c + 1 < capacity)
notFull.signal();
} finally {
putLock.unlock();
}
if (c == 0)
signalNotEmpty();
}

take()

1
2
3
4
5
6
7
8
9
10
11
12
13
14
15
16
17
18
19
20
21
public E take() throws InterruptedException {
E x;
int c = -1;
final AtomicInteger count = this.count;
final ReentrantLock takeLock = this.takeLock;
takeLock.lockInterruptibly();
try {
while (count.get() == 0) {
notEmpty.await();
}
x = dequeue();
c = count.getAndDecrement();
if (c > 1)
notEmpty.signal();
} finally {
takeLock.unlock();
}
if (c == capacity)
signalNotFull();
return x;
}

通过源码我们可以看到, LinkedBlockingQueue采用的是我们刚开始的wait-notify机制实现的, 只不过它没有使用Object提供的, 而是采用了java.util.concurrent.locks.Condition实现的.

由于LinkedBlockingQueue是基于链表做的, LinkedBlockingQueue对队头和队尾各自使用了一把锁来做并发控制.

put()方法中, 关键点在于搞清楚下面俩点:

  • if(c +1< capacity) notFull.signal();
  • if(c ==0) signalNotEmpty();
1
2
if (c + 1 < capacity)
notFull.signal();

这个是判断在多线程的环境下起到作用, 假设现在有4个线程都在await()处阻塞, take()取出一个数据, 现在唤醒了一个线程, 那么当该线程继续put的时候, 通过该判断, 如果队列非满则将阻塞在await()出的线程继续唤醒, 直到队列满了或者全部唤醒.

1
2
if (c == 0)
signalNotEmpty();

由于前边是调用的count.getAndIncrement(), 如果c为0, 那么现在队列里就有了一个元素, 唤醒阻塞在出列的await()处的线程, 可以继续出列, 取数据了.

以上就是put()入列分析, 出列流程也类似, 大家可以自己分析一下